免責聲明
本文章內容是作者自己的操作紀錄,內容顯示畫面可能因為服務提供廠商的服務變更而與實際畫面不同。本文章撰寫當時使用的服務基本都是免費申請,之後如果因為服務提供廠商更改服務合約,以致部分功能使用時需支付費用,作者將不負相關責任。
參考資源
- https://laravel.com/docs/8.x/socialite
- https://socialiteproviders.com
- https://pandalab.org/articles/63
- https://github.com/Laravel-Lang/lang
- https://developers.facebook.com
- https://vocus.cc/article/605c2eaefd89780001efb9fb
- https://dotblogs.com.tw/smallfish/2019/11/17/151112
- https://websolutionstuff.com/post/laravel-8-socialite-login-with-facebook-account
- https://www.remotestack.io/login-with-facebook-in-laravel-with-socialite-and-jetstream/
進行流程
- 到社群網站申請介接 API 資源,取得連線 ID、token、設定重新導向網址
- Larvel 專案因應社群帳號新增 migration,定義新增資料庫欄位
- 與會員資料表有關的 Model 增加社群帳號欄位敘述
- 建立對應操作的 Controller
- 建立對應路由
- 會員註冊、登入畫面新增社群帳號登入按鈕
- 測試社群帳號登入是否正常運作,資料庫是否有儲存會員資料
運作環境參考
- Laravel 8 全新專案
- Valet(為了 HTTPS 連線,macOS only)
- PHP 7.4
- MySQL 5.7
- Nginx 1.21.0
前置作業
建立新 Laravel 專案,專案名:socialite
composer create-project laravel/laravel socialite —prefer-dist
如果已安裝 laravel/installer 可使用
laravel new socialite
設定專案安全連線
valet secure socialite
瀏覽器輸入網址:https://socialite.test,如能以安全連線顯示 Laravel 預設頁面代表設定正確。
建立給 Laravel 專案使用的 MySQL 資料庫,在 .env 填入資料庫連線資訊:主機名稱、連線帳號、連線密碼、使用資料庫名。
切換至專案目錄
cd socialite
至 /config/app.php 修改時區
'timezone' => 'Asia/Taipei',
以及語系
'locale' => 'zh_TW',
安裝 Jetstream 作為會員運作機制,JS 框架使用 livewire
composer require laravel/jetstream
php artisan jetstream:install livewire
npm install
npm run dev
安裝翻譯資源
composer require laravel-lang/lang:~8.0
將 /vendor/laravel-lang/lang/src/zh_TW 資料夾複製到 /resources/lang 底下
執行資料庫遷移
php artisan migrate
安裝 Laravel Socialite
composer require laravel/socialite
/config/app.php Providers 部分增加
Laravel\\Socialite\\SocialiteServiceProvider::class,
/config/app.php aliases 部分增加
'Socialite' => Laravel\\Socialite\\SocialiteServiceProvider::class,
整合 Facebook 登入
準備 Facebook 登入參考資料
- 前置作業請參考前面「前置作業」單元
- 申請網站:Facebook 開發者網站:https://developers.facebook.com/
- 需 Facebook 開發者帳號,可免費申請。
- 可在本地環境測試:可,需 HTTPS 連線。
申請 Facebook 資源
前往 Facebook 開發者網站,然後登入。
點選右上方「我的應用程式」進入應用程式列表畫面,接著點選「 建立應用程式」,應用程式類型選擇「消費者」後點選下方「繼續」按鈕。
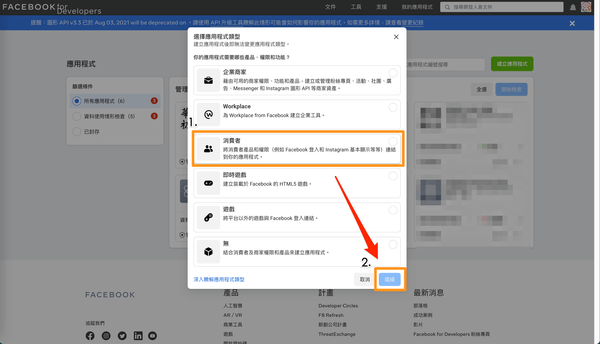
輸入應用程式基本資料後按「建立應用程式」建立。
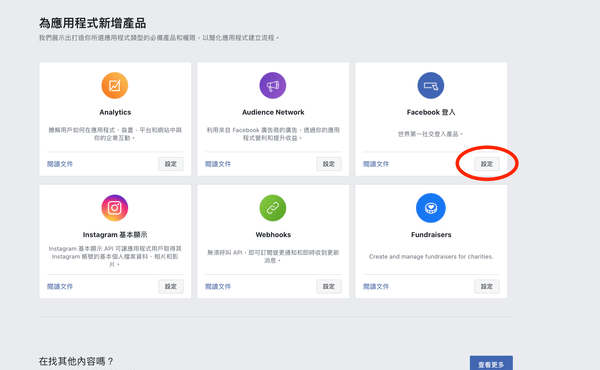
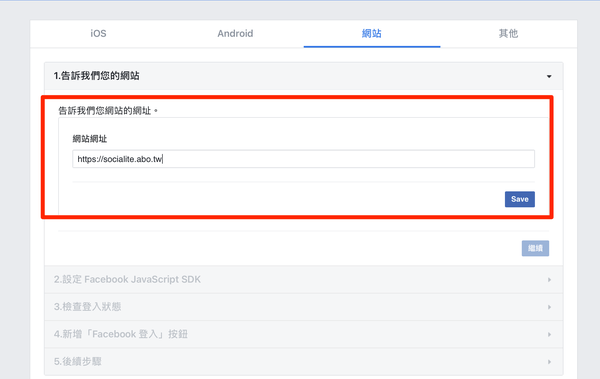
應用程式平台部分點選「網站」後進入快速設定。
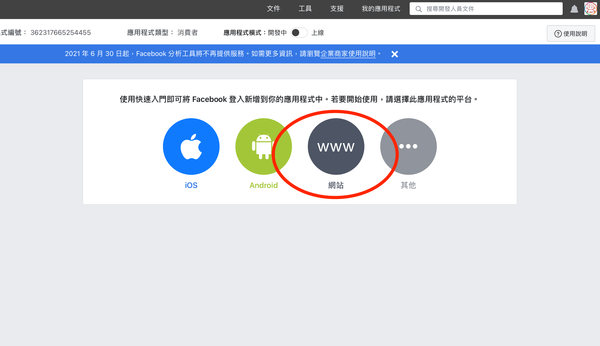
快速設定1:輸入你的網站網址(FDQN格式),按下「Save」按鈕後點選下方「繼續」按鈕繼續。
接下來的畫面解說網站快速導入 Facebook 登入的方法:加入 Facebook JavaScript SDK 程式碼以及 FB 按鈕程式碼,這部分可按「繼續」快速跳過。
快速設定流程結束後按「返回」回到應用程式主畫面,按下畫面右下方「儲存變更」儲存當前設定值。
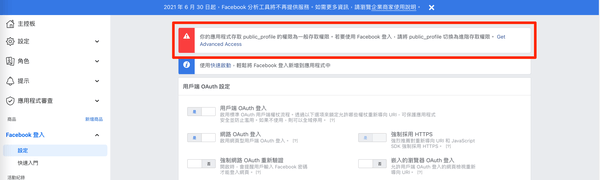
畫面上方提示應用程式的存取權限不足,點選畫面上方「Get Advanced Access」前往「應用程式審查 → 權限和功能」畫面。
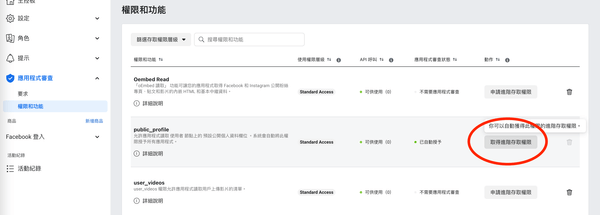
點選右方「public_profile」列中的「取得進階存取權限」項目提升存取權限。
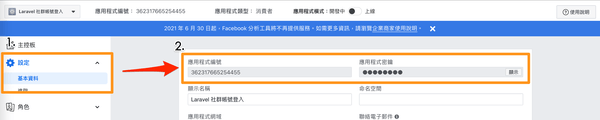
點選畫面左方「設定 → 基本資料」取得應用程式編號及應用程式密鑰資料,稍後要填入專案 .env。
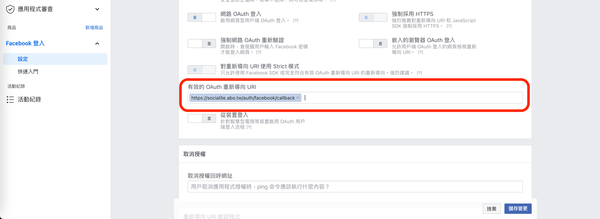
點選畫面左方「Facebook 登入 → 設定」,在右方「有效的 OAuth 重新導向 URI」欄位填入 https://socialite.abo.tw/auth/facebook/callback 後儲存。
加入 Facebook 介接資料
.env 加入 Facebook 介接資料:FB_CLINET_ID 填入應用程式編號;FB_CLIENT_SECRET 填入應用程式密鑰;FB_REDIRECT 填入先前「有效的 OAuth 重新導向 URI」欄位網址。
FB_CLIENT_ID=xxx
FB_CLIENT_SECRET=xxx
FB_REDIRECT=https://socialite.test/auth/facebook/callback
/config/services.php 加入 Facebook 介接敘述
// /config/services.php

'facebook' => [
    'client_id' => env('FB_CLIENT_ID'),
    'client_secret' => env('FB_CLIENT_SECRET'),
    'redirect' => env('FB_REDIRECT'),
]
資料庫異動
建立 migration:存放會員的資料表新增 Facebook ID 欄位。
php artisan make:migration add_facebook_id_to_users_table --table=users
<?php

use Illuminate\\Database\\Migrations\\Migration;
use Illuminate\\Database\\Schema\\Blueprint;
use Illuminate\\Support\\Facades\\Schema;

class AddFacebookIdToUserTable extends Migration
{
    /**
     * Run the migrations.
     *
     * @return void
     */
    public function up()
    {
        Schema::table('users', function (Blueprint $table) {
            //加入facebook_id欄位到password欄位後方
            $table->string('facebook_id', 30)
                ->nullable()
                ->after('password');

            //建立索引
            $table->index(['facebook_id'], 'user_fb_idx');
        });
    }

    /**
     * Reverse the migrations.
     *
     * @return void
     */
    public function down()
    {
        Schema::table('users', function (Blueprint $table) {
            //移除欄位
            $table->dropColumn('facebook_id');
        });
    }
}
與會員有關的 Model 增加社群帳號敘述:在 protected $fillable 部分增加 facebook_id 欄位。
<?php
// /app/Models/User.php

namespace App\\Models;

use Illuminate\\Contracts\\Auth\\MustVerifyEmail;
use Illuminate\\Database\\Eloquent\\Factories\\HasFactory;
use Illuminate\\Foundation\\Auth\\User as Authenticatable;
use Illuminate\\Notifications\\Notifiable;
use Laravel\\Fortify\\TwoFactorAuthenticatable;
use Laravel\\Jetstream\\HasProfilePhoto;
use Laravel\\Sanctum\\HasApiTokens;

class User extends Authenticatable
{
    use HasApiTokens;
    use HasFactory;
    use HasProfilePhoto;
    use Notifiable;
    use TwoFactorAuthenticatable;

    /**
     * The attributes that are mass assignable.
     *
     * @var array
     */
    protected $fillable = [
        'name',
        'email',
        'password',
        'facebook_id',
    ];

    /**
     * The attributes that should be hidden for arrays.
     *
     * @var array
     */
    protected $hidden = [
        'password',
        'remember_token',
        'two_factor_recovery_codes',
        'two_factor_secret',
    ];

    /**
     * The attributes that should be cast to native types.
     *
     * @var array
     */
    protected $casts = [
        'email_verified_at' => 'datetime',
    ];

    /**
     * The accessors to append to the model's array form.
     *
     * @var array
     */
    protected $appends = [
        'profile_photo_url',
    ];
}
執行 migration
php artisan migrate
建立 Controller
php artisan make:controller SocialiteController
建立兩個方法:fbLogin 方法導向 Facebook 社群帳號登入畫面;fbLoginCallback 用於 Facebook 傳回資訊的處理。fbLoginCallback 部分先以 dd 觀看傳回來的資訊是否符合預期。
<?php
// /app/Http/Controllers/SocialiteController.php

namespace App\\Http\\Controllers;

use Illuminate\\Http\\Request;
use Exception;
use App\\Models\\User;
use Illuminate\\Support\\Facades\\Auth;
use App\\Http\\Controllers\\Controller;
use Laravel\\Socialite\\Facades\\Socialite;
use Hash;
use Validator;

class SocialiteController extends Controller
{
    public function fbLogin()
    {
        return Socialite::driver('facebook')->redirect();
    }

    public function fbLoginCallback()
    {
        $user = Socalite::driver('facebook') -> user();
        dd($user);
}
增加路由
/route/web.php 增加路由:
Route::get('/auth/facebook', [SocialiteController::class, 'fbLogin'])->name('/auth/facebook');
Route::get('/auth/facebook/callback', [SocialiteController::class, 'fbLoginCallback'])->name('/auth/facebook/callback');
增加 Facebook 登入按鈕
安裝 Jetstream 後註冊頁面的 Blade 檔案位置在 /resources/views/auth/register.blade.php,在 </form> 標籤上方位置加入以下內容:
{{-- Login with Facebook --}}
            <div class="flex items-center justify-end mt-4">
                <a class="btn" href="{{ url('auth/facebook') }}"
                    style="background: #3B5499; color: WHITE; padding: 5px; width: 100%; text-align: center; border-radius:5px;  display: block;">
                    Facebook 登入
                </a>
            </div>
存檔後前往專案註冊頁面,點選「Facebook 登入」按鈕測試流程。
確認可以從 Facebook 獲得登入資訊後修改 SocialiteController 的 fbLoginCallback 方法,把以 Facebook 帳號登入的使用者資料也寫入資料庫,寫入前會先檢查資料表中是否已有相同 email 信箱,如果有僅寫入 Facebook ID 資料,沒有則建立新帳號,之後導向主控台。
public function fbLoginCallback()
    {
        $user = Socialite::driver('facebook')->user();
        $existUser = User::where('email', $user->email)->first();
        $findUser = User::where('facebook_id', $user->id)->first();

        //資料庫已有會員 Facebook ID 資料時重新導向至主控台
        if($findUser){
            Auth::login($findUser);
            return redirect()->intended('dashboard');
        }
        //如果會員資料庫中沒有 Facebook ID 資料,將檢查資料庫中有無會員 email,如果有僅加入 Facebook ID 資料後導向主控台
        if($existUser != '' && $existUser->email === $user->email){
            $existUser->facebook_id = $user->id;
            $existUser->save();
            Auth::login($existUser);
            return redirect()->intended('dashboard');
        }else{
        //資料庫無會員資料時註冊會員資料,然後導向主控台
            $newUser = User::create([
                'name' => $user->name,
                'email' => $user->email,
                'facebook_id'=> $user->id,
                'password' => encrypt('fromsocialwebsite'),
                ]);
            Auth::login($newUser);
            return redirect()->intended('dashboard');
        }
    }
測試完成後記得回到 Facebook 開發者網站,點選畫面上方「應用程式模式」切換到「上線」,開放給一般使用者使用。
整合 Google 帳戶登入
準備 Google 帳戶登入參考資料
- 前置作業請參考前面「前置作業」單元
- Google API 頁面:https://console.developers.google.com/
- 需 Google 帳戶,可免費申請。
- 可在本地環境測試:否,需實際可連線的網域名稱,HTTPS 連線。
申請 Google 帳號介接資料
登入你的 Google 帳戶,如果沒有請先建立一個。
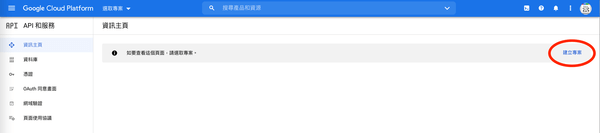
前往 Google API 頁面:https://console.developers.google.com/
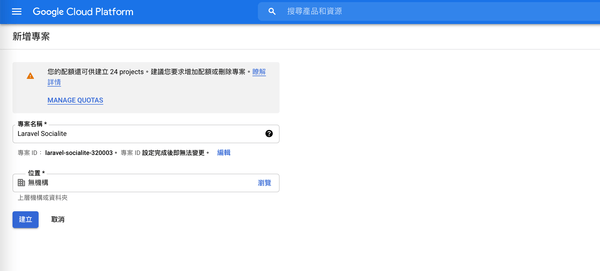
建立專案:點選「建立專案」,輸入專案名稱(同時生成專案 ID)後按「建立」。
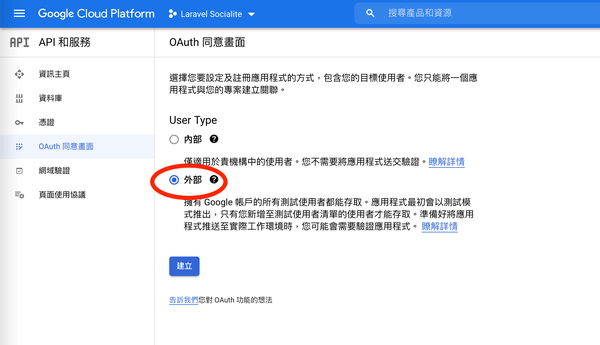
點選資訊主頁左方的「oAuth 同意畫面」,「User Type」項目選擇「外部」後按「建立」。
流程一:填寫應用程式註冊資料,然後按畫面下方「儲存並繼續」。
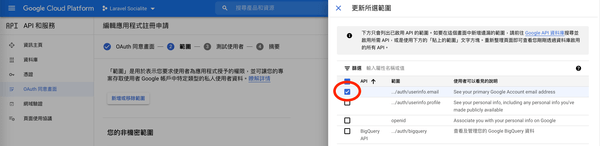
流程二:勾選範圍:點選「新增或移除範圍」後勾選要存取的項目,需要透過 email 信箱檢查是否已有帳號登入所以勾選「userinfo.email」項目,然後點選畫面下方「更新」按鈕,再點選畫面下方「儲存並繼續」。
流程三:增加參與測試的使用者資料,如果只有自己測試的話可直接點選「儲存並繼續」前往下個流程。
流程四:顯示整個流程的摘要資料。
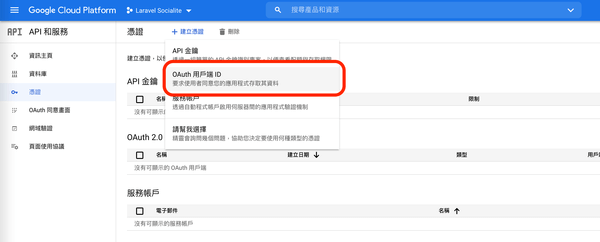
點選畫面左方的「憑證」,接著點選「建立憑證 → oAuth用戶端 ID。
選擇應用程式類型:網頁應用程式,輸入應用程式名稱,「已授權的重新導向 URI」欄位輸入:https://socialite.abo.tw/auth/google/callback 後按「建立」。
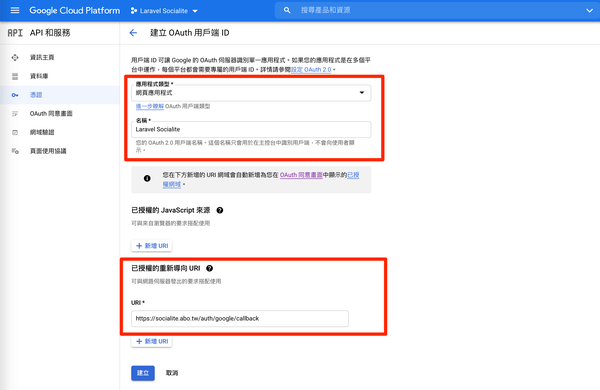
畫面顯示取得的「用戶端 ID」及「用戶端密碼」,請記錄下來等等要加入專案 .env。

加入 Google 介接資料
.env 加入 Google 介接資料:G_CLINET_ID 填入用戶端 ID;G_CLIENT_SECRET 填入鬨物端密碼;G_REDIRECT 填入先前「已授權的重新導向 URI」欄位網址。
G_CLIENT_ID=xxx
G_CLIENT_SECRET=xxx
G_REDIRECT=https://socialite.test/auth/google/callback
/config/services.php 加入 Google 介接敘述
// /config/services.php

'google' => [
    'client_id' => env('G_CLIENT_ID'),
    'client_secret' => env('G_CLIENT_SECRET'),
    'redirect' => env('G_REDIRECT'),
],
新增 Google 帳號的 migration
php artisan make:migration add_google_account_to_users_table --table=users
<?php

use Illuminate\\Database\\Migrations\\Migration;
use Illuminate\\Database\\Schema\\Blueprint;
use Illuminate\\Support\\Facades\\Schema;

class AddGoogleAccountToUserTable extends Migration
{
    /**
     * Run the migrations.
     *
     * @return void
     */
    public function up()
    {
        Schema::table('users', function (Blueprint $table) {
            //加入google_account欄位到facebook_id欄位之後
            $table->string('google_account', 30)
                ->nullable()
                ->after('facebook_id');
            //建立索引
            $table->index(['google_account'], 'user_g_idx');

        });
    }

    /**
     * Reverse the migrations.
     *
     * @return void
     */
    public function down()
    {
        Schema::table('users', function (Blueprint $table) {
            //移除欄位
            $table->dropColumn('google_account');
        });
    }
}
與會員資料表有關的 Model 增加社群帳號欄位敘述
在 protected $fillable 部分增加 google_account 欄位。
<?php

namespace App\\Models;

use Illuminate\\Contracts\\Auth\\MustVerifyEmail;
use Illuminate\\Database\\Eloquent\\Factories\\HasFactory;
use Illuminate\\Foundation\\Auth\\User as Authenticatable;
use Illuminate\\Notifications\\Notifiable;
use Laravel\\Fortify\\TwoFactorAuthenticatable;
use Laravel\\Jetstream\\HasProfilePhoto;
use Laravel\\Sanctum\\HasApiTokens;

class User extends Authenticatable
{
    use HasApiTokens;
    use HasFactory;
    use HasProfilePhoto;
    use Notifiable;
    use TwoFactorAuthenticatable;

    /**
     * The attributes that are mass assignable.
     *
     * @var array
     */
    protected $fillable = [
        'name',
        'email',
        'password',
        'facebook_id',
        'google_account',
    ];

    /**
     * The attributes that should be hidden for arrays.
     *
     * @var array
     */
    protected $hidden = [
        'password',
        'remember_token',
        'two_factor_recovery_codes',
        'two_factor_secret',
    ];

    /**
     * The attributes that should be cast to native types.
     *
     * @var array
     */
    protected $casts = [
        'email_verified_at' => 'datetime',
    ];

    /**
     * The accessors to append to the model's array form.
     *
     * @var array
     */
    protected $appends = [
        'profile_photo_url',
    ];
}
進行遷移
php artisan migrate
建立對應操作的 Controller
如尚未建立 Controller 請先利用 php artisan make:controller (Controller名字) 建立,在其中建立兩個方法:googleLogin 重新導向至 Google 帳戶登入頁面;googleLoginCallback 則處理 Google 回傳資料,目前先以 dd 函式驗證傳回資訊。
public function googleLogin()
    {
        return Socialite::driver('google')->redirect();
    }

public function googleLoginCallback()
    {
        $user = Socalite::driver('google') -> user();
        dd($user);
		}
建立對應路由
Route::get('/auth/google', [SocialiteController::class, 'googleLogin'])->name('/auth/google');
Route::get('/auth/google/callback', [SocialiteController::class, 'googleLoginCallback'])->name('/auth/google/callback');
會員註冊、登入畫面新增社群帳號登入按鈕
在會員註冊與登入 Blade 檔案(如 /resources/views/auth/register.blade.php、/resources/views/auth/login.blade.php)加入 Google 帳戶登入按鈕。
{{-- Login with Google account --}}
            <div class="flex items-center justify-end mt-4">
                <a class="btn" href="{{ url('auth/google') }}"
                    style="background: #FF3333; color: WHITE; padding: 5px; width: 100%; text-align: center; border-radius:5px;  display: block;">
                    Google 帳戶登入
                </a>
            </div>
測試社群帳號登入是否正常運作,資料庫是否有儲存會員資料
在 callback 方法的運作一開始使用 dd 函式測試是否能從 Google 接收到使用者資料,測試無誤後就要改成寫入會員資料庫作業了。
由於不知道使用者在點選「Google 帳戶登入」按鈕前是否已經在網站註冊,或是使用其他社群帳號(例如 Facebook)登入過,所以會先檢查會員資料表中是否有相同的 email 信箱,如果有就僅寫入 Google 帳戶 ID,之後導向會員頁面,無信箱資料則進行新會員註冊作業,將資料寫入資料庫。
public function googleLoginCallback()
    {
        $user = Socialite::driver('google')->user();
        $existUser = User::where('email', $user->email)->first();
        $findUser = User::where('google_account', $user->id)->first();

        if($findUser){
            Auth::login($findUser);
            return redirect()->intended('dashboard');
        }
        //如果會員資料庫中沒有 Google 帳戶資料,將檢查資料庫中有無會員 email,如果有僅加入 Google 帳戶資料後導向主控台
        if($existUser != '' && $existUser->email === $user->email){
            $existUser->google_account = $user->id;
            $existUser->save();
            Auth::login($existUser);
            return redirect()->intended('dashboard');
        }else{
        //資料庫無會員資料時註冊會員資料,然後導向主控台
            $newUser = User::create([
                'name' => $user->name,
                'email' => $user->email,
                'google_account'=> $user->id,
                'password' => encrypt('fromsocialwebsite'),
                ]);
            Auth::login($newUser);
            return redirect()->intended('dashboard');
        }
    }
整合 LINE 帳號登入
準備 LINE 帳號登入參考資料
- 前置作業請參考前面「前置作業」單元。
- Laravel Socialite 沒有提供 LINE driver,改用 Socialite Providers 套件。
- 申請網站:LINE 開發者網站:https://developers.line.me/console/
- 需 LINE 帳號,如果沒有請先安裝 LINE APP 註冊一個。
- 可在本地環境測試:可,需 HTTPS 連線。
安裝、配置 Socialite Providers 套件
- 依照要介接的社群帳號選擇安裝的套件,以 LINE 來說會是:
composer require socialiteproviders/line - 加入 provider:如已先安裝 Laravel Socialite,請至
/config/app.php,在providers陣列中移除或註記Laravel\\Socialite\\SocialiteServiceProvider,加入\\SocialiteProviders\\Manager\\ServiceProvider::class - 加入監聽事件:在
/app/Providers/EventServiceProvider.php檔案中的 listen 陣列中加入\\SocialiteProviders\\Manager\\SocialiteWasCalled::class => [], - 依照要加入的社群帳號項目加入先前的陣列中,以 LINE 帳號登入而言是:
'SocialiteProviders\\\\Line\\\\LineExtendSocialite@handle',
申請 LINE 帳號登入資源
前往 LINE 開發者網站,然後登入。
點選左方「Providers」,然後點選右方「Create」,接著輸入服務名稱後按「Create」。

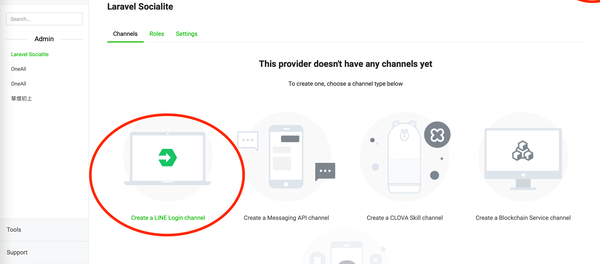
畫面提示尚未建立任何頻道,點選「Create a LINE Login channel」建立 。
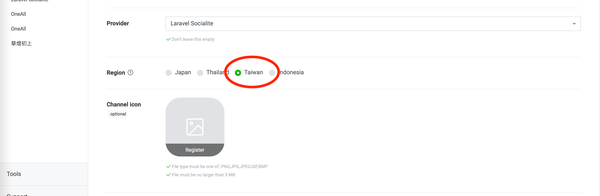
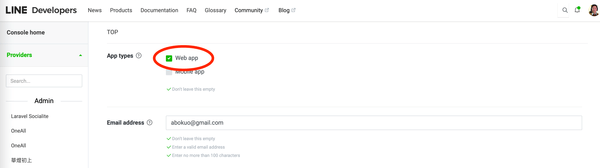
輸入頻道基本資料,「Region」部分選擇「Taiwan」,「App types」勾選「web app」,最後點選最下方的「Create」建立。
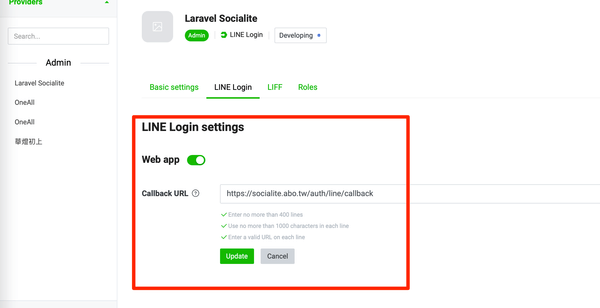
點選「LINE Login」分頁,接著點選「Callback URL」項目右下的「Edit」按鈕,輸入 callback 網址,如:https://socialite.test/auth/line/callback
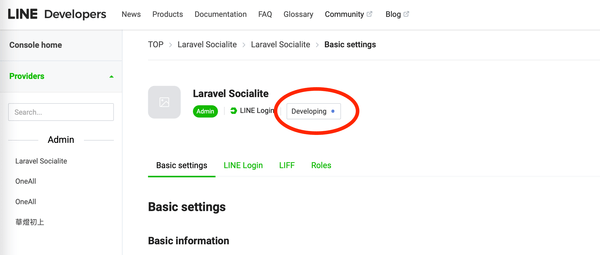
回到「Basic settings」分頁,將「Channel ID」(對應 .env 參數「LINE_CLINET_ID)與「Channel Secret」(對應 .env 參數「LINE_CLINET_SECRET)紀錄下來備用。
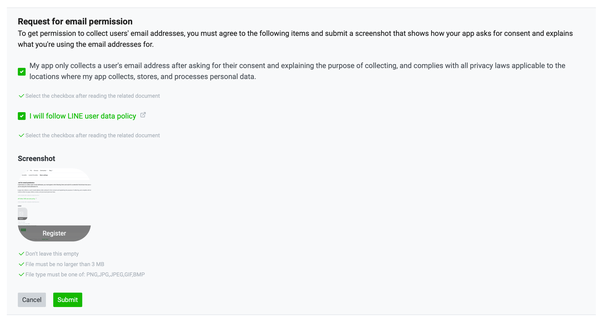
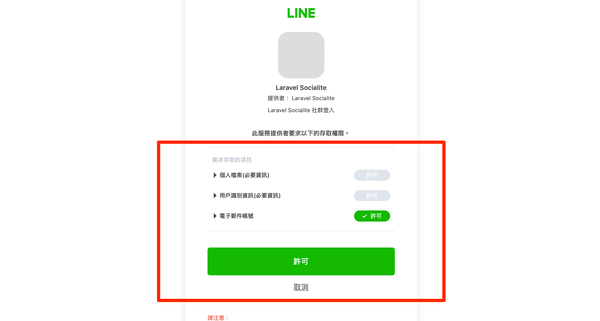
Basic Settings 分頁下方有個「OpenID Connect → Email address permission」的設定,是使用者同意收集 email 資料的設定,請務必套用(Apply)此設定:將有關網站收集使用者 email 的方式、儲存、用途等說明頁面截圖下來上傳。

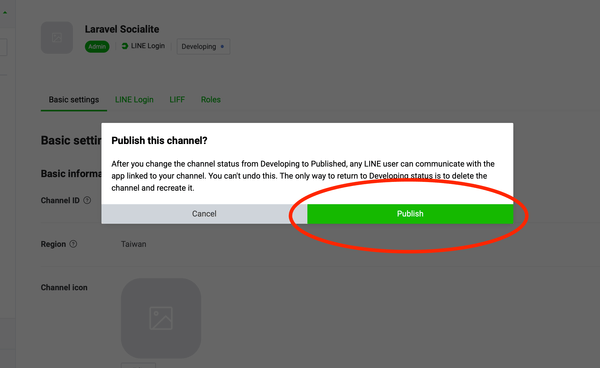
點選 Channel 狀態從「DEVELOP」為「Published」後開始使用。
加入 LINE 介接資料
.env 加入 LINE 介接資料
LINE_CLIENT_ID=xxx
LINE_CLIENT_SECRET=xxx
LINE_REDIRECT_URI=https://socialite.test/auth/line/callback
config/services.php 加入 LINE 介接敘述
// /config/services.php

'line' => [
        'client_id' => env('LINE_CLIENT_ID'),
        'client_secret' => env('LINE_CLIENT_SECRET'),
        'redirect' => env('LINE_REDIRECT_URI')
    ],
更新配置快取
php artisan config:cache
資料庫異動
建立 migration,在會員資料表中加入 LINE 帳號定義欄位,注意 LINE id 長度是 32 字。
php artisan make:migration add_line_id_to_users_table --table=users
<?php

use Illuminate\\Database\\Migrations\\Migration;
use Illuminate\\Database\\Schema\\Blueprint;
use Illuminate\\Support\\Facades\\Schema;

class AddLineIdToUserTable extends Migration
{
    /**
     * Run the migrations.
     *
     * @return void
     */
    public function up()
    {
        Schema::table('users', function (Blueprint $table) {
            //加入 LINE ID 欄位到 google_account欄位之後
            $table->string('line_id', 64)
                ->nullable()
                ->after('google_account');
            //建立索引
            $table->index(['line_id'], 'user_l_idx');
        });
    }

    /**
     * Reverse the migrations.
     *
     * @return void
     */
    public function down()
    {
        Schema::table('users', function (Blueprint $table) {
            //移除欄位
            $table->dropColumn('line_id');
        });
    }
}
與會員有關的 Model 增加社群帳號敘述:在 protected $fillable 部分增加 line_id 欄位。
<?php
// /app/Models/User.php

namespace App\\Models;

use Illuminate\\Contracts\\Auth\\MustVerifyEmail;
use Illuminate\\Database\\Eloquent\\Factories\\HasFactory;
use Illuminate\\Foundation\\Auth\\User as Authenticatable;
use Illuminate\\Notifications\\Notifiable;
use Laravel\\Fortify\\TwoFactorAuthenticatable;
use Laravel\\Jetstream\\HasProfilePhoto;
use Laravel\\Sanctum\\HasApiTokens;

class User extends Authenticatable
{
    use HasApiTokens;
    use HasFactory;
    use HasProfilePhoto;
    use Notifiable;
    use TwoFactorAuthenticatable;

    /**
     * The attributes that are mass assignable.
     *
     * @var array
     */
    protected $fillable = [
        'name',
        'email',
        'password',
        'facebook_id',
				'google_account',
				'line_id',
    ];

    /**
     * The attributes that should be hidden for arrays.
     *
     * @var array
     */
    protected $hidden = [
        'password',
        'remember_token',
        'two_factor_recovery_codes',
        'two_factor_secret',
    ];

    /**
     * The attributes that should be cast to native types.
     *
     * @var array
     */
    protected $casts = [
        'email_verified_at' => 'datetime',
    ];

    /**
     * The accessors to append to the model's array form.
     *
     * @var array
     */
    protected $appends = [
        'profile_photo_url',
    ];
}
執行 migration
php artisan migrate
建立對應操作的 Controller
如尚未建立 Controller 請先利用 php artisan make:controller (Controller名字) 建立,在其中建立兩個方法:lineLogin 重新導向至 LINE 帳戶登入頁面;lineLoginCallback 則處理 LINE 回傳資料,目前先以 dd 函式驗證傳回資訊。
<?php
// /app/Http/Controllers/SocialiteController.php

namespace App\\Http\\Controllers;

use Illuminate\\Http\\Request;
use Exception;
use App\\Models\\User;
use Illuminate\\Support\\Facades\\Auth;
use App\\Http\\Controllers\\Controller;
use Laravel\\Socialite\\Facades\\Socialite;
use Hash;
use Validator;

class SocialiteController extends Controller
{
// 中略

public function lineLogin()
    {
        return Socialite::driver('line')->redirect();
    }

    public function lineLoginCallback()
    {
        $user = Socialite::driver('line')->user();
        dd($user);
		}
}
增加路由
/route/web.php 增加路由:
Route::get('/auth/line', [SocialiteController::class, 'lineLogin']);
Route::get('/auth/line/callback', [SocialiteController::class, 'lineLoginCallback']);
增加 LINE 帳號登入按鈕
在會員註冊與登入 Blade 檔案(如 /resources/views/auth/register.blade.php、/resources/views/auth/login.blade.php)加入 LINE 帳號登入按鈕。
{{-- Login with LINE account --}}
            <div class="flex items-center justify-end mt-4">
                <a class="btn" href="{{ url('auth/line') }}"
                    style="background: #33AA33; color: WHITE; padding: 5px; width: 100%; text-align: center; border-radius:5px;  display: block;">
                    LINE 帳號登入
                </a>
            </div>
存檔後前往專案註冊頁面,點選「LINE 帳號登入」按鈕測試流程。
測試社群帳號登入是否正常運作,資料庫是否有儲存會員資料
在 callback 方法的運作一開始使用 dd 函式測試是否能從 LINE 接收到使用者資料,測試無誤後就要改成寫入會員資料庫作業了。
由於不知道使用者在點選「LINE 帳號登入」按鈕前是否已經在網站註冊,或是使用其他社群帳號(例如 Facebook)登入過,所以會先檢查會員資料表中是否有相同的 email 信箱,如果有就僅寫入 LINE 帳號 ID,之後導向會員頁面,無信箱資料則進行新會員註冊作業,將資料寫入資料庫。
public function lineLoginCallback()
    {
        $user = Socialite::driver('line')->user();
        $existUser = User::where('email', $user->email)->first();
        $findUser = User::where('line_id', $user->id)->first();

        //資料庫已有會員 Facebook ID 資料時重新導向至主控台
        if($findUser){
            Auth::login($findUser);
            return redirect()->intended('dashboard');
        }
        //如果會員資料庫中沒有 Facebook ID 資料,將檢查資料庫中有無會員 email,如果有僅加入 Facebook ID 資料後導向主控台
        if($existUser != '' && $existUser->email === $user->email){
            $existUser->line_id = $user->id;
            $existUser->save();
            Auth::login($existUser);
            return redirect()->intended('dashboard');
        }else{
        //資料庫無會員資料時註冊會員資料,然後導向主控台
            $newUser = User::create([
                'name' => $user->name,
                'email' => $user->email,
                'line_id'=> $user->id,
                'password' => encrypt('fromsocialwebsite'),
                ]);
            Auth::login($newUser);
            return redirect()->intended('dashboard');
        }
    }
總結
本文敘述如何透過 Laravel Socialite 及 Socialite Providers 套件為 Laravel 專案增加社群網站帳號登入功能,在會員資料庫部分僅增加社群網站 id 欄位,如果需要從社群網站取得更多會員資訊請參考社群網站的授權規定。
在敘述申請社群網站資源時並未提及「服務條款」「隱私權政策」等網站向使用者說明其資料收集與利用方式的文件,在網站正式運作前請別忘了備齊並檢附上述文件網址在申請資料中。

居住在臺灣的 Joomler,期望以程式設計、開放原碼推廣活動收入養活一家老小。
35 歲後改姓李,id 作為曾為郭姓的證明。
FFXI:Abokuo@Sylph鯖、よろしくです。